Android Jetpack Navigation Pitfalls & Tricks
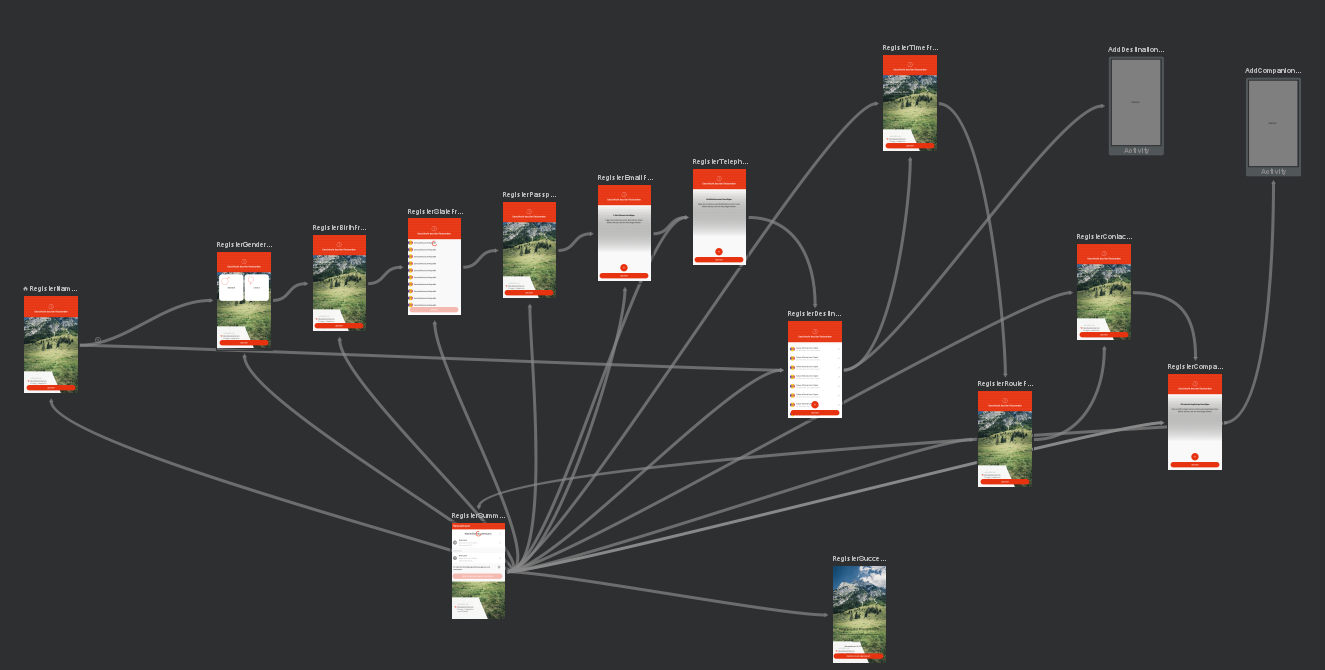
Table of content
- Send Args to fragments within activities
- Use startActivityForResult with the Navigation library
- Use generic naming for action names
- Reuse fragments in multiple navigation graphs
- TLDR
- Further readings
Navigation library from Jetpack offers a great variety of helpful tools, especially with the SafeArgs extension. My last project contained many different navigation flows paired with a large number of screens, so I decided to try the new navigation library which had just reached a stable release. With this article I would like to share some of the tricks and pitfalls I came across during development.
This article assumes that the reader already knows the library — if not, I recommend the official documentation as well as the linked articles in the TLDR section.
Send Args to fragments within activities
Sometimes it is necessary to start an activity which itself is a NavHost and pass arguments to the hosted fragment. E.g. imagine a ListFragment, which starts a DetailActivity with a DetailFragment. The DetailFragment needs an id of the item it displays.
With the classic Navigation Graph it would look like the following:
<navigation xmlns:android="http://schemas.android.com/apk/res/android"
    xmlns:app="http://schemas.android.com/apk/res-auto"
    xmlns:tools="http://schemas.android.com/tools"
    android:id="@+id/main_nav_graph"
    app:startDestination="@id/ListFragment">
    <fragment
        android:id="@+id/ListFragment"
        android:name="at.allaboutapps.ListFragment"
        android:label="fragment_list"
        tools:layout="@layout/fragment_list" />
    <activity
        android:id="@+id/DetailActivity"
        android:name="at.allaboutapps.DetailActivity"
        android:label="activity_detail"
        tools:layout="@layout/activity_detail">
        <argument
            android:name="id"
            app:argType="long" />
    </activity>
</navigation>
<navigation xmlns:android="http://schemas.android.com/apk/res/android"
xmlns:app="http://schemas.android.com/apk/res-auto"
xmlns:tools="http://schemas.android.com/tools"
android:id="@+id/detail_nav_graph"
app:startDestination="@id/DetailFragment">
<fragment
android:id="@+id/DetailFragment"
android:name="at.allaboutapps.DetailFragment"
android:label="fragment_detail"
tools:layout="@layout/fragment_detail"
<argument
android:name="id"
app:argType="long" />
</fragment>
</navigation><?xml version="1.0" encoding="utf-8"?>
<FrameLayout xmlns:android="http://schemas.android.com/apk/res/android"
android:layout_width="match_parent"
android:layout_height="match_parent">
<fragment
android:id="@+id/detailNavigationFragment"
android:name="androidx.navigation.fragment.NavHostFragment"
android:layout_width="match_parent"
android:layout_height="match_parent"
app:defaultNavHost="true"
app:navGraph="@navigation/detail_nav_graph"/>
</FrameLayout>The question now is: how do we pass the id argument to the DetailFragment? The library doesn’t offer us the option to define some kind of start argument for a navigation graph or similar. If we would deploy these two graphs with the default navigation attributes in the layout XML it would crash since the DetailFragment would not get the required arguments set and the library doesn’t know, where to retrieve these.
The trick is relatively simple:
- Don’t set
app:defaultNavHostandapp:navGraphin the layout file - Set the
NavHostprogrammatically - Set the arguments programmatically
The layout now looks as following:
<?xml version="1.0" encoding="utf-8"?>
<FrameLayout xmlns:android="http://schemas.android.com/apk/res/android"
    android:layout_width="match_parent"
    android:layout_height="match_parent">
    <fragment
        android:id="@+id/detailNavigationFragment"
        android:name="androidx.navigation.fragment.NavHostFragment"
        android:layout_width="match_parent"
        android:layout_height="match_parent" />
</FrameLayout>
And in the DetailActivity we need to add:
class DetailActivity : AppCompatActivity() {

  val args: DetailActivityArgs by navArgs()

  override fun onCreate(savedInstanceState: Bundle?) {
    super.onCreate(savedInstanceState)
    setContentView(R.layout.activity_detail)
    findNavController(R.id.detailNavigationFragment).setGraph(R.navigation.detail_nav_graph, args.toBundle())
  }
 }
As you can see, it doesn’t really cost us much effort to pass the arguments here. And since the arguments of DetailFragment and DetailActivity are called the same, the library can parse the fragment arguments and we have the id at the right place!
Use startActivityForResult with the Navigation library
Well, the simplest answer here is: you don’t. At the moment of writing this article, there is no equivalent for startActivityForResult. There are (some attempts to solve this, but in most of the cases it’s sufficient to use the default approach and still use startActivityForResult without the Navigation library.
But in case you don’t want to miss the type safety of the NavArgs and maybe extend the previous situation of passing arguments to the hosted fragment, it can look like this:
class DetailActivity : AppCompatActivity() {
  companion object {
    private const val EXTRA_ID = "id"
    private const val ACTIVITY_RESULT = "ACTIVITY_RESULT"
    fun getIntent(context: Context, id: Long): Intent =
      Intent(context, DetailActivity::class.java)
        .putExtra(EXTRA_ID, id)
  }

  lateinit var args: DetailActivityArgs

  override fun onCreate(savedInstanceState: Bundle?) {
    super.onCreate(savedInstanceState)
    setContentView(R.layout.activity_detail)
	args = DetailActivityArgs.fromBundle(intent.extras!!)
    findNavController(R.id.detailNavigationFragment).setGraph(R.navigation.detail_nav_graph, args.toBundle())
  }
  ...
  fun finishActivity(result: String) {
    val intent = Intent().putExtra(ACTIVITY_RESULT, result)
    setResult(Activity.RESULT_OK, intent)
    finish()
  }
 }
Use generic naming for action names
Let’s imagine the following situation: we have a registration of some sort with a lot of screens. In my case I had up to 12 fragments to handle:

Awesome, right? Now, let’s say, we want to change the existing order of screens:
- Without the Navigation library it’s a mess, every fragment has a reference to the next one and we don’t have any overview which is linked to which at the moment.
- With the Navigation Editor of Android Studio we have at least an overview which fragment is currently linked to which. But still, if we change something in the graph, we need to change the fragments itself as well. Not really handy here.
The solution is pretty simple: use generic action names. Don’t use names like goToFirstName(), custom to each fragment, but use names like next(), which is used everywhere the same. The corresponding navigation graph to the image looks as following:
<?xml version="1.0" encoding="utf-8"?>
<navigation xmlns:android="http://schemas.android.com/apk/res/android"
    xmlns:app="http://schemas.android.com/apk/res-auto"
    android:id="@+id/registration_nav_graph"
    app:startDestination="@id/RegisterNameFragment">

    <fragment
        android:id="@+id/RegisterBirthFragment"
        android:name="at.allaboutapps.RegisterBirthFragment"
        android:label="fragment_register_birth" >
        <action
            android:id="@+id/next"
            app:destination="@id/RegisterStateFragment"/>
    </fragment>

    <fragment
        android:id="@+id/RegisterCompanionFragment"
        android:name="at.allaboutapps.RegisterCompanionFragment"
        android:label="fragment_register_companion" />

    <fragment
        android:id="@+id/RegisterContactFragment"
        android:name="at.allaboutapps.RegisterContactFragment"
        android:label="fragment_register_contact" >
        <action
            android:id="@+id/next"
            app:destination="@id/RegisterCompanionFragment"/>
    </fragment>

    <fragment
        android:id="@+id/RegisterDestinationFragment"
        android:name="at.allaboutapps.RegisterDestinationFragment"
        android:label="fragment_register_destination" >
        <action
            android:id="@+id/next"
            app:destination="@id/RegisterTimeFragment"/>
    </fragment>

    <fragment
        android:id="@+id/RegisterEmailFragment"
        android:name="at.allaboutapps.RegisterEmailFragment"
        android:label="fragment_register_destination" >
        <action
            android:id="@+id/next"
            app:destination="@id/RegisterTelephoneFragment" />
    </fragment>

    <fragment
        android:id="@+id/RegisterGenderFragment"
        android:name="at.allaboutapps.RegisterGenderFragment"
        android:label="fragment_register_gender" >
        <action
            android:id="@+id/next"
            app:destination="@id/RegisterBirthFragment"/>
    </fragment>

    <fragment
        android:id="@+id/RegisterPassportFragment"
        android:name="at.allaboutapps.RegisterPassportFragment"
        android:label="fragment_register_passport" >
        <action
            android:id="@+id/next"
            app:destination="@id/RegisterEmailFragment" />
    </fragment>

    <fragment
        android:id="@+id/RegisterNameFragment"
        android:name="at.allaboutapps.RegisterNameFragment"
        android:label="fragment_register_name" >
        <action
            android:id="@+id/next"
            app:destination="@id/RegisterGenderFragment"/>
    </fragment>

    <fragment
        android:id="@+id/RegisterRouteFragment"
        android:name="at.allaboutapps.RegisterRouteFragment"
        android:label="fragment_register_route" >
        <action
            android:id="@+id/next"
            app:destination="@id/RegisterContactFragment"/>
    </fragment>

    <fragment
        android:id="@+id/RegisterStateFragment"
        android:name="at.allaboutapps.RegisterStateFragment"
        android:label="fragment_register_state" >
        <action
            android:id="@+id/next"
            app:destination="@id/RegisterPassportFragment" />
    </fragment>

    <fragment
        android:id="@+id/RegisterTelephoneFragment"
        android:name="at.allaboutapps.RegisterTelephoneFragment"
        android:label="fragment_register_telephone" >
        <action
            android:id="@+id/next"
            app:destination="@id/RegisterDestinationFragment" />
    </fragment>

    <fragment
        android:id="@+id/RegisterTimeFragment"
        android:name="at.allaboutapps.RegisterTimeFragment"
        android:label="fragment_register_time">
        <action
            android:id="@+id/next"
            app:destination="@id/RegisterRouteFragment"/>
    </fragment>

</navigation>
With this setup we can easily change the order of the screens by simply changing the NavGraph — the library generates us the Directions and we don’t need to touch the fragments!
Reuse fragments in multiple navigation graphs
There might be some circumstances where it makes sense to reuse the same fragment in different NavGraphs. E.g. if a registration uses in some sub-flows the same fragments.
First: try to avoid this situation. The Navigation library is meant to be used within a single-activity application and doesn’t really like the reuse of the same fragments in different NavGraphs. The ugly thing here is, that each NavGraph generates actions and arguments with the same name. And if two NavGraphs using the same fragment with different actions and arguments, they are overwriting each other in a non-deterministically way.
There are some tricks to work around this:
-
Avoid this situation
Seriously, this is nasty. Since the NavGraph processing happens non-deterministically it can happen that the local build is fine but fails on the build server because it’s overridden in a different way.
-
Use fake arguments
If one NavGraph uses more arguments for a fragment than another one, still include these arguments into both graphs and think about reasonable default values. Don’t rely on it, that the NavGraph with more arguments gets processed first — in doubt that’s not the case.
-
Use
navigate()with bundle instead of actions in edge casesIn edge cases e.g. if a fragment is used at the end of a flow (meaning no further action) in one NavGraph and in the middle of the flow (meaning with further actions) don’t (conditionally) call
findNavController().navigate(FragmentDirections.goToDetailFragment(id))but instead usefindNavController().navigate(R.id.DetailFragment, bundleOf("id" to 5)). This way you don’t rely on the generated direction but can still use the Navigation and SafeArgs features of the DetailFragment.
TLDR
- Args can easily be passed from activity to fragment by setting the NavHost programmatically
- There is no equivalent of
startActivityForResult, but we can generate the Args from the intent extras. - Generic naming of actions helps to easily change the order of screens within a flow.
- Try to avoid using the same fragment with different arguments & actions in multiple NavGraphs since the code might break due to nondeterministic class generation.
Further readings
- Official Documentation
- Using Navigation Architecture Component in a large banking app by David Vávra (advanced article)
- Android Navigation Components by Dario Mungoi (basic introduction)
- Android Jetpack - NavigationUI by Sagar Viradiya (advanced article)